

Easy Guide to Heat Pump Thermostat Wiring
Installing or upgrading a heat pump thermostat may look intimidating, but with the right understanding of wiring, it becomes a manageable project. Whether you’re a homeowner upgrading to a smart thermostat or a building professional handling multiple systems, knowing the wiring basics ensures efficient heating and cooling. This guide explains the essentials of heat pump thermostat wiring, step by step, in clear and practical terms.
Why Wiring Matters in Heat Pump Systems
Unlike conventional furnaces or air conditioners, heat pumps handle both heating and cooling. That means their thermostats require additional connections to control reversing valves, auxiliary heat, and emergency heat. A proper wiring setup ensures:
- Correct switching between heating and cooling modes
- Optimal efficiency and energy savings
- Safe operation of auxiliary and emergency heat functions
Miswiring can lead to issues like the system blowing cold air in winter or running backup heat unnecessarily, which drives up costs.
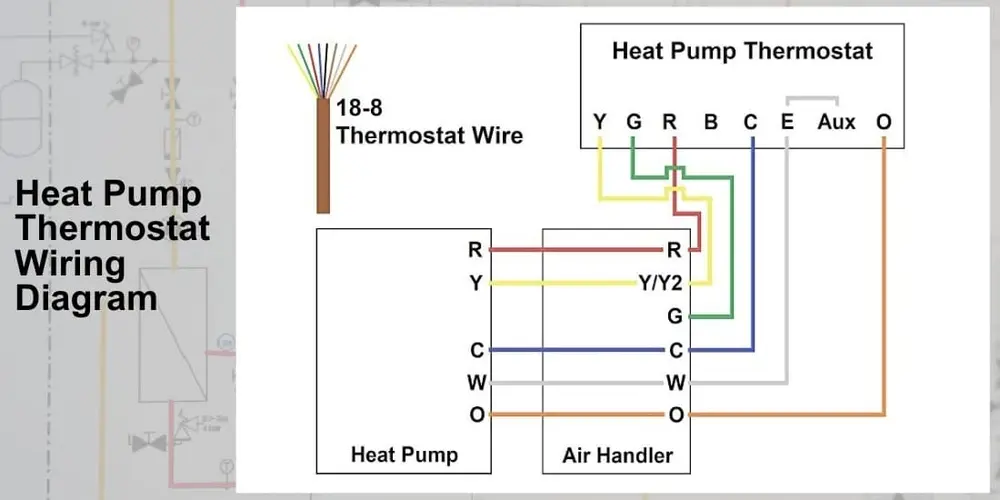
Understanding Heat Pump Thermostat Terminals
Most heat pump thermostats use low-voltage (24V) wiring. Every cable is attached to a terminal labeled with a letter. Here’s what the main terminals typically control:
- R (Red): Power from the transformer (24V supply)
- C (Blue or Black): Common wire, completing the 24V circuit
- Y (Yellow): Compressor relay for cooling (and heating in heat pump mode)
- G (Green): Indoor fan blower
- O/B (Orange/Blue): Changeover valve (alternates between heating and cooling).
- W (White): Auxiliary or emergency heat
- E (Sometimes separate): Emergency heat, depending on the thermostat model
Not every system will use every terminal. Always confirm with your heat pump and thermostat manuals.
Heat Pump vs. Conventional Thermostat Wiring
A key difference between heat pump thermostats and standard furnace/AC thermostats is the O/B terminal. Conventional systems don’t need a reversing valve, but heat pumps do. This wire tells the system whether to run in heating or cooling mode.
Another difference is auxiliary heating. Heat pumps lose efficiency in very cold temperatures, so many systems use electric resistance heating as a backup. That’s where the W/Aux terminal comes in.
Step-by-Step Wiring Process
If you’re replacing or installing a thermostat, follow this general process:
Turn Off Power
Shut off the power at the breaker box. Working with live 24V wires is unsafe and can damage components.
Remove Old Thermostat
Take note of the existing wire connections. A photo can save time later.
Match Wires to New Terminals
Wire the new thermostat in line with the provided labels:
- Red to R
- Yellow to Y
- Green to G
- Orange/Blue to O/B
- White to Aux/W
- Blue/Black to C (if required for power)
Secure and Mount
Make sure wires are firmly in place, then mount the thermostat base.
Restore Power and Test
Turn power back on and run the thermostat through heating and cooling modes to confirm correct operation.
Common Wiring Issues to Watch For
Even with clear labeling, problems can arise:
No C Wire: Many older systems lack a common wire, which smart thermostats often require. A C-wire adapter or a professional retrofit may be needed.
Reversing Valve Confusion: Some manufacturers energize the reversing valve in cooling (O wire), while others energize it in heating (B wire). Always check your system’s documentation.
Loose Connections: Even one loose wire can cause intermittent heating or cooling failures. Double-check connections before powering up.
When to Call a Professional
For straightforward replacements, DIY installation is often possible. However, if your system includes dual fuel (heat pump plus furnace), zoning, or advanced controls, professional installation is highly recommended. Complex setups may require wiring adjustments, control boards, or compatibility checks.
Final Thoughts
Accurate wiring of the thermostat ensures consistent and efficient heat pump function. By understanding the role of each terminal and following a careful step-by-step process, both homeowners and building professionals can ensure proper operation.
If you’re upgrading to a modern smart thermostat, always confirm compatibility with your specific heat pump model. nd when in doubt, don’t hesitate to bring in an HVAC professional to guarantee safe, efficient results - acjakarta.com.